barrel 3d model for drawing
Matching a Photo to a Model (or a Model to a Photograph)
SketchUp'south Match Photo characteristic has inspired many happy dances, considering it enables you to
- Apply a photo to an existing model: Say you have a model of an existing structure and you lot want the model to look realistic. Applying a photo with Lucifer Photo is much easier than drawing that detail and applying materials to individual elements.
- Create a model from a photograph: When yous want to model an existing structure, Friction match Photo enables you to apply a photo as a starting bespeak. You lot can essentially trace the photo to depict the model.
Until y'all become the hang of Lucifer Photo, you may suspect that SketchUp dumped a box of rainbow spaghetti on your model like a toddler bored with pasta crafts. Match Photo is a bit disruptive at outset, merely this article gives you the tips and steps that you need to use Match Photo in the magical mode its developers intended. When you're first learning how to utilise Friction match Photo, orient yourself to the color-coded tools that Lucifer Photograph spills onto your screen and bank check out what photos work well with the Match Photo feature. Then try your hand at matching a photograph, following the detailed steps in the post-obit sections.
Tip: In this YouTube video, you lot come across Friction match Photo in action. Although the demo uses an older version of SketchUp, the process in current versions of SketchUp is similar.
Tabular array of Contents
- Introducing Match Photo's color-coded tools
- Choosing photos that piece of work with Friction match Photo
- Matching a photo with an existing model
- Creating a 3D model from a photo
- Deleting a matched photo
Introducing Match Photograph'due south color-coded tools
To start using Match Photo, select Camera > Friction match New Photo. Select the photograph you want to utilize, and your screen looks something like the following figure, which shows an paradigm captured from Google Street View. The following list identifies all the tools that appear on-screen:
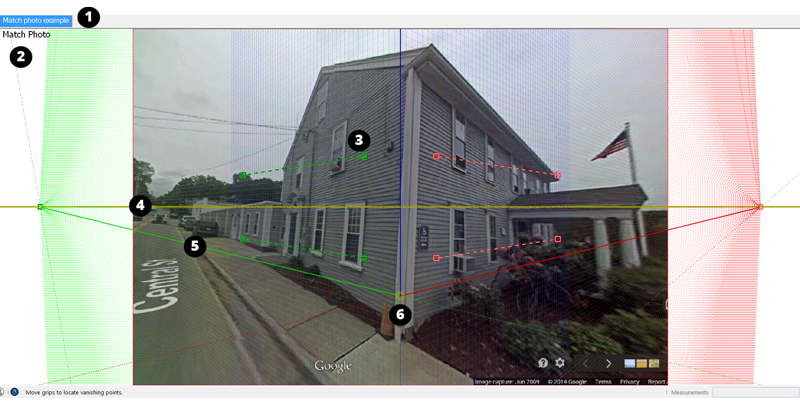
- Scene tab: A scene is a saved camera view of your model that's associated with a tab. If you orbit away from this detail view, the matched photograph disappears. But y'all can click the Match Photo scene tab to return to the view with the photo.
- Friction match Photograph view: When the camera is in Match Photograph view, you run across Match Photo in the upper left of the drawing window.
- Vanishing point bar: You see two greenish bars and ii cherry bars with dashed lines and a square grip on each end. You click and drag the grips to align these confined with elements in your photograph.
- Horizon line: This yellow line aligns with the horizon in your model. Typically, if you set the vanishing point confined, the horizon line takes care of itself.
- Centrality bars: The solid green, red, and bluish lines represent each axis. Every bit yous adjust the vanishing signal bars, the axis bars motility, too, so you normally don't need to adjust these manually. You can click and drag upwards and downwards the blue axis bar to roughly scale your photograph.
- Axis origin: The origin is where the three axes meet. If y'all start with a Friction match Photo-compatible image, Match Photo does a pretty good job of locating the origin for you, but you might need to adjust information technology a bit. In the example, the origin needs to motility down a chip so the axis origin is at the corner where the walls and ground meet. (If the photo looks downwards on a building, try a corner where the roof and walls instead.) For a photo taken indoors, place the origin where the walls and ceiling or the walls and flooring meet in a corner.
Tip: The Match Photo dialog box is some other important tool that appears when you enter Match Photograph view. Find out how and when to choose features in the dialog box as y'all walk through the steps for matching a photo with an existing model or creating a 3D model from a photo.
Choosing photos that piece of work with Match Photo
Match Photo works best when your photo meets sure criteria. When you lot're taking or choosing photos to use with SketchUp's Friction match Photo characteristic, proceed the following tips in mind:
- Lucifer Photo works all-time with structures made mostly of right angles. You definitely need at least one right bending for Match Photo to work.
- Utilize photos taken at a roughly a 45-degree angle from a corner. The preceding effigy from Google Street View is an example of an image taken at a 45-caste angle. If yous're taking photos, yous can use Friction match Photograph on several parts of your model if you take photos of each corner.
- Practise not ingather photos. Although it may seem possible to use a cropped paradigm, typically vertical lines don't align well across a cropped image, and you won't similar the consequence.
- Avoid warped or distorted photos if you can. Match Photo doesn't piece of work best with images that an image editor or specialized camera has warped. For instance, considering the Google Street View camera warped the image of the preceding building a fleck every bit the camera went effectually the corner, the vanishing point bars, axes, and horizon may not line upwards precisely. However, the school firm photos used subsequently in this article match up exactly with the model, because the photos had no distortion at all.
Tip: Sometimes an paradigm editor tin can remove butt distortion or issues where straight lines are bent abroad from the center of the prototype. Barrel distortion typically occurs on broad angle lens cameras.
- Avoid stitched images (panoramas). Stitched images are typically excessively warped and have multiple vanishing points for each axis.
- Cull photos without foreground features. When trees and other foreground objects block the view of a building, those foreground elements become in the mode of drawing a model based on your photograph.
- Make sure your prototype has 2 vanishing points. You'll have a hard fourth dimension adjusting the vanishing bespeak bars if your image has only one, infinite vanishing point, such equally a hallway or a long train rail. Similarly, images taken with a very long telephoto lens (or a satellite or aerial epitome) also make adjusting the vanishing point bars difficult.
Matching a photo with an existing model
To apply a photo to an existing model with SketchUp's Match Photograph characteristic, have your model and your photo on your difficult drive. When you're ready, follow these steps:
- Select File > Open and select the model you lot desire to open in the drawing area. This example uses the post-obit model of a schoolhouse.
- Select Camera > Lucifer New Photo.
- In the Select Groundwork Image File dialog box that appears, navigate to your image file and click Open up. The camera switches to Friction match Photo view, and so your photograph appears in the drawing area, as shown in the following figure, and your camera angle is automatically saved to a scene tab, which appears in the upper left.
Tip: When a Match Photo is active, you can context-click whatsoever Friction match Photo tool to open a context card. Select First Over or Cancel Match if your photo matching goes amiss. Select Zoom Matched Photograph to fit your photo in the drawing expanse. Zoom Vanishing Points zooms then that all the vanishing points fit in the drawing area.
- In the Match Photograph dialog box, shown in the post-obit figure, select the mode that reflects the type of photograph you lot accept. Click Inside for an interior prototype, click Above for an exterior photo of a building taken from the top, or click Outside an exterior photo taken from the ground.
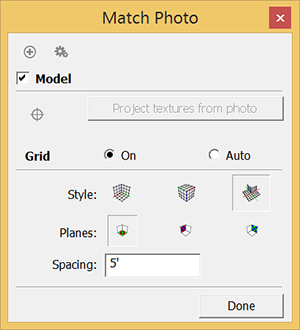
Tip: You tin can adjust the grid to suit your preferences and assist you align and scale your photo. Select the Car radio button to make the grid appear only when y'all're adjusting one of the matching tools. (The vanishing point bars, horizon bar, and axes are always visible in Match Photo view.) Use the Planes options to select whether you want the grid to bear witness the red/greenish, red/blue, or dark-green/blueish planes. Type a value in the Spacing text box to set the size of the grid spacing, which can help y'all calibration your model to a multiple of the actual construction's size.
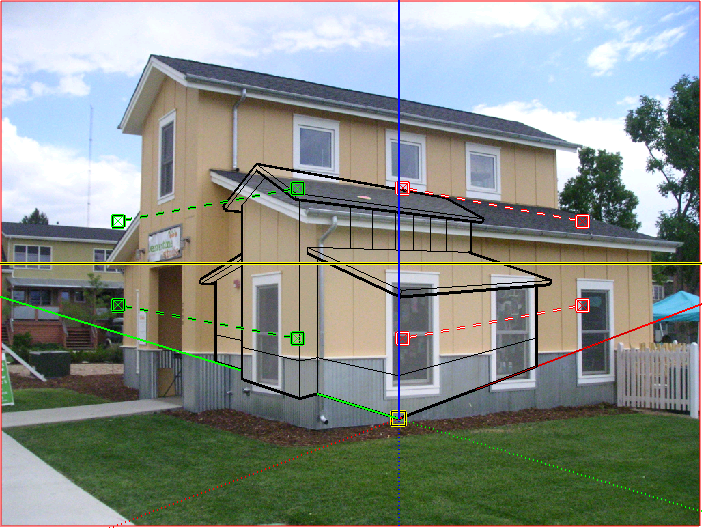
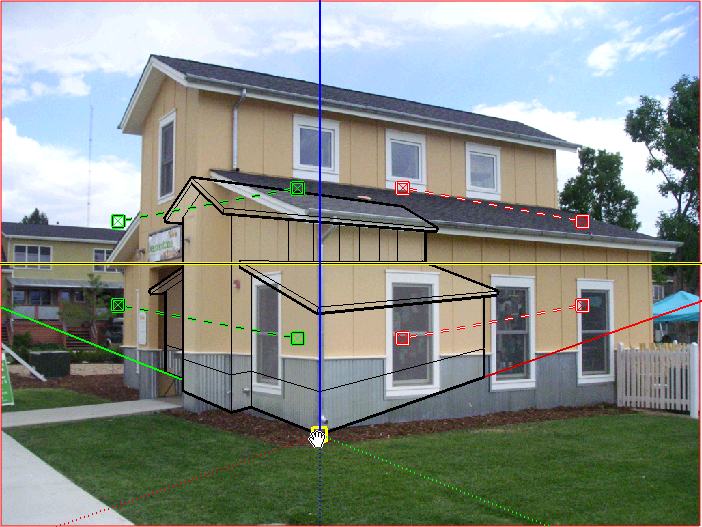
- Click and drag the axis origin to a singled-out origin point on your photo. In this example, that's the corner where the building meets the basis, as shown in the following effigy. Run across Introducing Match Photo'due south color-coded tools for tips on setting the axis origin.
- (Optional) Clear the Model checkbox to hide your model from view. You don't take to hide your model, but it's often a little easier to line up the vanishing point bars with the photo if the lines in your model aren't competing with your photo.
- Click and drag the grips on each of the four vanishing indicate bars. Align the light-green vanishing bespeak bars with photo elements that demand to be parallel the green axis bar. Brand the cherry vanishing confined align with photo elements that are parallel with the red axis bar. The example in the following figure illustrates how the vanishing point bars marshal with their respective centrality bar.
Tip: Window frames, door frames, and roof lines are handy reference points for aligning the vanishing signal bars. Also, the longer the vanishing indicate bar extends, the better your results.
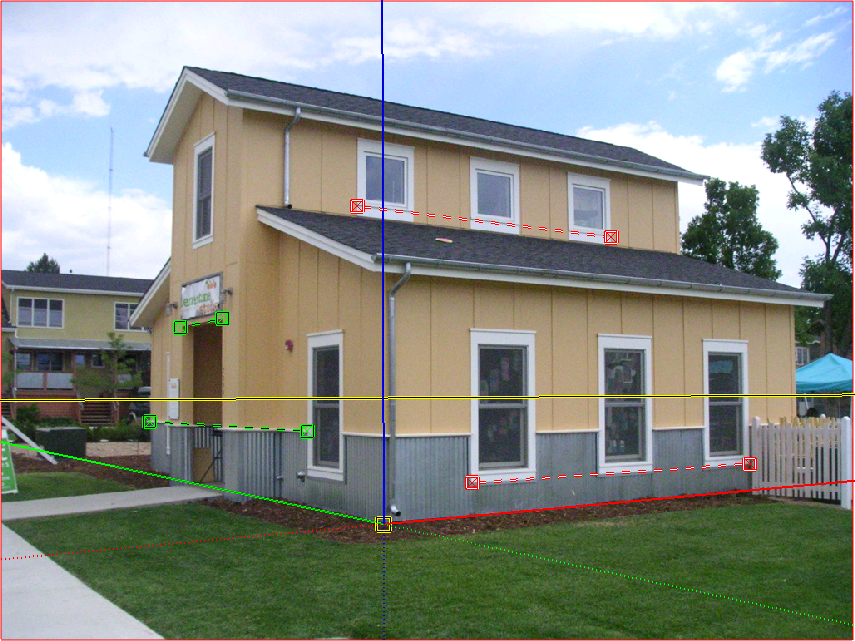
- Select the Model checkbox in the Friction match Photo dialog box then that your model reappears.
- Hover the cursor over the blue axis bar. When a two-headed arrow cursor appears, click and drag the cursor upwards or downwards the blue axis bar to calibration your model. You want the model outline to line up with your photograph, as shown in the following figure.
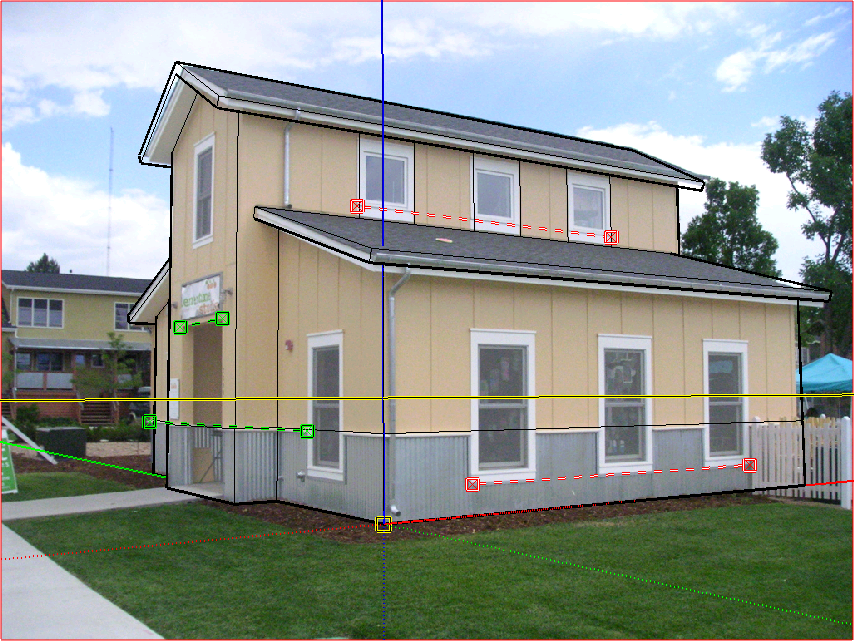
- (Optional) In the Match Photo dialog box, click theProjection Textures from Photograph button to project the photo on the model. If you project textures, you can meet the photo applied to your model'south faces every bit you orbit effectually y'all model. The following figure shows textures projected on the schoolhouse example.
Note: If your model already contains materials, SketchUp asks whether you want to supervene upon the existing materials. You may as well run across the
Trim partially visible faces?message. If then, click Yes to employ photo textures only to the visible portion of faces in your model. Click No to utilize textures to an unabridged face, even only a office of the confront is visible.

- Click the Done button to exit the Lucifer Photo toolset.
Tip: In the Match Photo dialog box, you tin can click Edit Matched Photo (the gear icon at the height) to adjust the Match Photo tools.
Note: If you lot've taken several photos that yous're matching to each corner of a building, context-click a Match Photo tool and choose Rotate 90 Correct or Rotate 90 Left. These commands move the red and green axes 90 degrees. If the commands don't work well with your model and photograph, merely move the axes in the opposite management, and click New Matched Photograph button (the plus sign icon in the upper left of the Match Photo dialog box). A new Match Photo scene appears, and yous can then place a new photo and set the origin point manually.
Creating a 3D model from a photo
If you have a photograph of something y'all want to model, Lucifer Photo tin help you draw the 3D model.
Tip: This process works best for objects with parallel lines, such as the elevation and bottom of a rectangular window.
To draw a model with the help of a photograph and SketchUp's Match Photo feature, follow these steps:
- Follow the steps in the preceding section, "Matching a photo with an existing model," to gear up your axis origin, vanishing point confined, and calibration. The only departure is that you don't demand to worry well-nigh opening the model that goes with your photo or projecting textures onto a non-still-existing model. These steps explicate how to describe the model based on your photo.
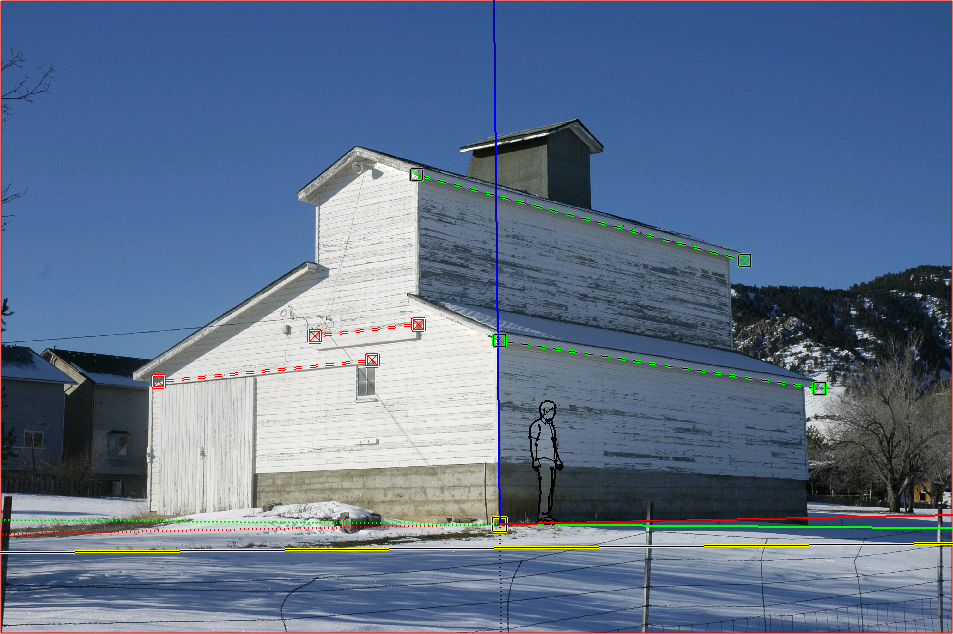
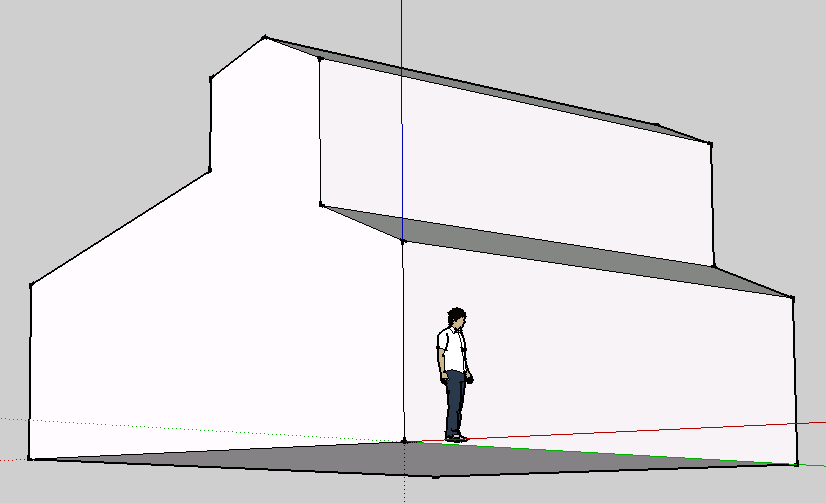
Tip: To help you set the scale of your photo, insert i of SketchUp's 2D people, as shown in the figure. If you don't already meet one of these folks in your model already, discover them in the Components panel.
- Select the Line tool
 .
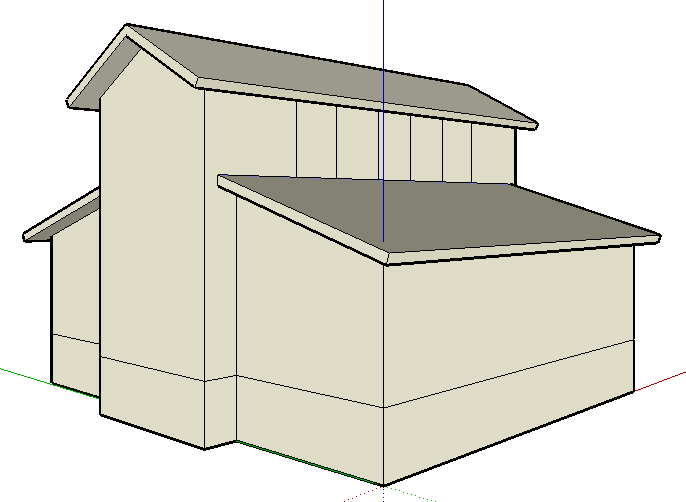
. - Starting at the centrality origin, trace ane of the edges in your photo. Continue tracing edges until you create a confront.
- Use SketchUp'due south tools to continue creating your 3D model based on the photo. For example, after tracing the side of the barn shown in the following figure, you lot might utilize the Push/Pull tool
 to extrude the face, as shown in the following effigy. When you use the drawing tools, you lot'll likely leave the Match Photograph view. Click the Lucifer Photograph tab encounter your photo again and check the length of your extrusion confronting the length of the befouled in your photo.
Tip: The procedure of modeling from a photograph is iterative. You'll likely do a lilliputian drawing, bank check your model against the photo, do a piddling more than drawing, and so on.
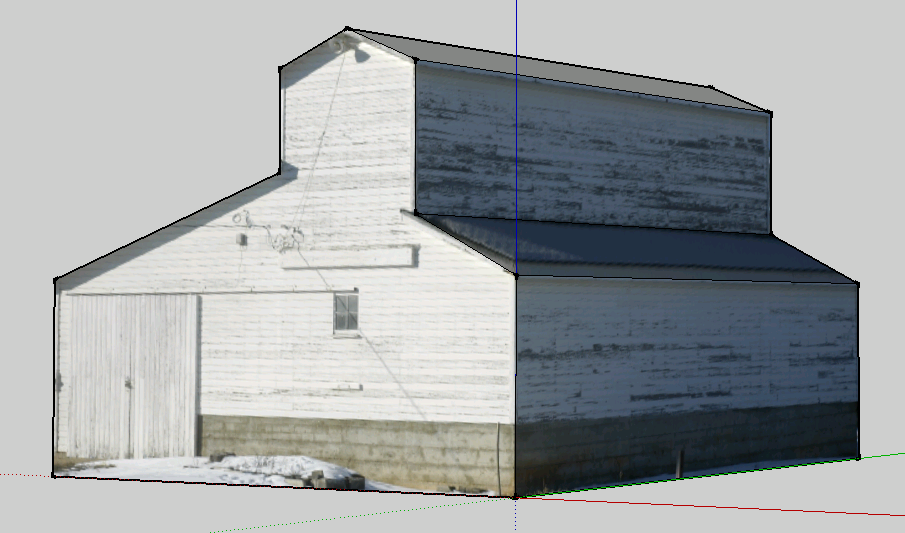
- (Optional) Click the scene tab to see your photograph and project the photo textures onto your model. To exercise so, click Project Textures from Photo in the Match Photo dialog box or context-click the photo and choose Project Photo from the carte that appears. In the effigy, y'all see the barn textures projected onto the model.
Deleting a matched photo
If your matched photo didn't work out or you don't demand information technology whatsoever more, you but delete the Match Photograph scene. Hither are two means to do and then:
- Context-click the scene tab and select Delete from the menu that appears.
- Select Window > Scenes. Open the Scenes dialog In the Scenes dialog that appears, select the scene with your matched photo and then click Remove Scene (the minus sign icon).
thorntongracts1957.blogspot.com
Source: https://help.sketchup.com/en/sketchup/matching-photo-model-or-model-photo
0 Response to "barrel 3d model for drawing"
Post a Comment